Java Utveckling för webben med hjälp av Spring Boot gör många av Java tekniker enklare att använda på en webbapplikation. Exemplar består av databasanvändning (Data source), säkerhet (Security), och Sessions. I det här inlägget beskriver jag olika färdiga tekniker genom sina egna projekt. Varje projekt som länkas till är en färdig projekt som jag använder som en exempel på tekniken, förklaras kort på varje film.
App 1
Här är Spring Boot projektet som använder Spring Boot Security med en databas för inloggningar samt en NoOpPasswordEncoder. Här finns projektet för att ladda ner: 1.SpringBootSecurityWithDataSource,NoOpPasswordEncoder
App 2
Här är Spring Boot Security appen med BCrypt som password encoder: Här finns projektet för att ladda ner:
Här är Spring Boot Security appen som använder sig av Sessions för att spara användaresinformation som till exempel användarnamn på sessions. Här finns projektet för att ladda ner: Spring Boot Security och Session från databasinformation
App 4
Här är två appar som samarbetar: en Java Spring Boot applikation och en Angular applikation. En fungerar på backend och serverar JSON objekter och en presenterar en “drag and drop” gränssnitt för interaktioner på JSON slutpunkter. Gränssnittet använder JSON Objekter för att göra interaktioner möjligt i samband med resurs och klient hantering. Nedan finns en demo film. För att köra Java Spring Boot applikationen så behövs det att du har en Redis Server och MySQL databas på plats. En exempel på hur den databasen kan se ut finns i Java appens källkatalog. Koden på de två appar finns för nedladdning: TwoApps–backend with JSON Rest (using Java), frontend with drag and drop (using Angular)
These are links to resources that describe how to access data via queries in a Spring Boot application. The Spring repository to work with will extend the Crud repository and will include methods that have annotations such as @Query and @Modifying. The queries can use JPQL or be native SQL.
To include HTML or dynamic HTML parts into a Thymeleaf template, Thymeleaf uses the concept and term: “fragments”, which assists with inserting or replacing parts of your pages with other parts. Here is a tutorial: https://www.baeldung.com/spring-thymeleaf-fragments
There are cases in designing a database where the value of one particular field (say, Id field) of a first table holds association with many possible values of a field (say, Id) in a second table, and vise-versa, that is, the second table also has this same field (Id) associated with many possible Ids of the first table. An example is a database that has two tables: Users, and Roles: One user can have many Roles, and one Role can be associated with many users. Another example is the example of a subscription database: one subscriber can have association with several magazines and one magazine has association with many subscribers. A third example would be a movies and categories database: the movies table can be included in many categories and one category would include many movies. This type of table design in a database is what is called as designing a many-to-many SQL relationship.
Below is a review on preparing such tables and their relationship and to insert and retrieve records accordingly.
And to select records from the two table we would use LEFT JOIN.
To get a movie with a given Id (say, movie with Id 8:
SELECT m.*, c.* FROM movie as m
LEFT JOIN movie_category_junction as mc ON m.movie_id = mc.movie_id
LEFT JOIN category AS c on mc.category_id = c.category_id
WHERE m.movie_id = 8;
To get a movie with a given Id 9:
SELECT m.*, c.* FROM movie as m
LEFT JOIN movie_category_junction as mc ON m.movie_id = mc.movie_id
LEFT JOIN category AS c on mc.category_id = c.category_id
WHERE m.movie_id = 9;
And to get the category with a given category Id, say category 11, we would do:
SELECT m.*, c.* FROM category as c
LEFT JOIN movie_category_junction as mc ON c.category_id = mc.category_id
LEFT JOIN movie AS m on mc.movie_id = m.movie_id
WHERE c.category_id = 11;
Many to many relationships occur where two tables have fields that can be associated with more than one field in both ways. This is where a many to many relationship can be applied via SQL. In the above example, a third table was created to hold the relationship.
A Java EE application should be designed with a structure that is easily understandable and makes a balanced use of Data Access Objects, Entities, REST controller, transactions and a database back end. To have the app hosted on WildFly 18.0.1 application server we would require a connection to the database on the server. Below are the basics for the preparation process in order to have a basic application run:
1.
Set up a database. In our example, we set up a database called “WorkSuggest1” and set up a table within the database called “Person”:
When the database is set up, start preparing the WildFly database connector and the data source that will be used in the application. A CLI script can be very useful to have this done. The script below (written by instructors at IT Högskolan Göteborg) helps to set up the module, given that you have the MySQL connector, so keep reading past the script below for more details. The link to the database is also needed. Be sure that the MySQL Connector is in c:\Users folder and the connector version is the one you have.
Normally, a MySQL connector is found in form of a Jar file such as the one found at Jar-download.com, which will accompany a “module.xml” file. To complete the set up, follow a good tutorial on how to set up MySQL database connection on WildFly application server, such as this one.
In general, be sure that you have the database connector, the required module file, and the link to the database set up correctly as they are required for your Java EE application to interact with the database. Some side notes while you are setting them up are:
The connector and the module.xml file should be placed in a directory structure that you create under the “base” folder hierarchy in the WildFly 18 folder structure — more specifically in the folder: C:\wildfly-18.0.1.Final\modules\system\layers\base. Here you will create a “com” folder, add a “mysql” folder there, and in it create a “main” folder. In this main folder you place the mysql connector file as well as the module.xml file.
The module.xml file could have content similar to the one below.
Continue the set up of the database for use via the application server. Given that you will use the CLI script above, place the CLI script in the bin folder of the WildFly 18.0.1 folder, go to the bin folder, and run the script while the server is running. Assuming you are using Windows PowerShell it would be:
.\jboss-cli -c --file=worksuggest1.cli
4.
Upon receiving success message, proceed to setting up the IntelliJ project which should have a Maven.pom.xml file with dependencies as described in the below pom.xml file:
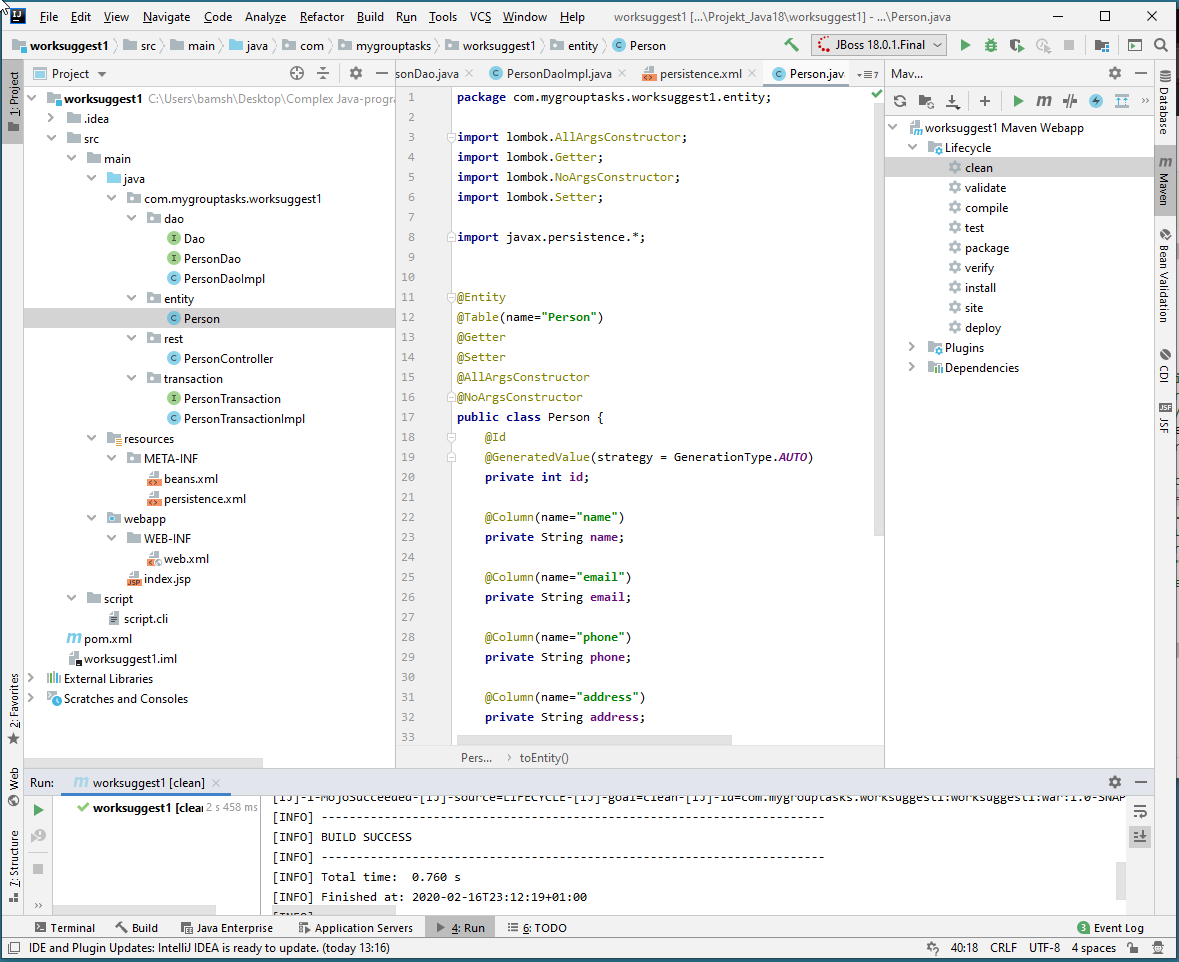
A file structure such as the one shown below can help with the development of the project with respective Java EE concepts considered:
7.
The complete and working project (given that the MySQL database is available and the WildFly 18.0.1 application server are running) is included in the zip file below.
INSERT IGNORE INTO student (id, forename, lastname, email) VALUES (20,"Bob","L.","test@test.com");
save the last insert Id:
SET @last_id = LAST_INSERT_ID();
get the last insert Id:
SELECT @last_id;
Alter a table, add a column:
ALTER TABLE table_name ADD column_name datatype;
eg:
ALTER TABLE `resource` ADD `url` varchar(255);
Alter a table column, i.e.: ALTER TABLE table_name MODIFY COLUMN column_name datatype;
ALTER TABLE `users` MODIFY COLUMN id INT(11) NOT NULL;
Alter a table, drop a column:
ALTER TABLE `tableName` DROP COLUMN `columnName`;
Update a table column, i.e.: UPDATE table_name SET column1 = value1, column2 = value2, … WHERE condition;
UPDATE `users` SET id=6 WHERE username='user1';
Add a foreign key to an existing table:
ALTER TABLE`tablename` ADD CONSTRAINT `fk_namedescrip` FOREIGN KEY (`fieldinthistable`) REFERENCES referringtable(fieldinthereferringtable);
Update one or two tables that have foreign keys which make updating rise a foreign key constraint.
-- set foreign key checks to 0 first...
SET FOREIGN_KEY_CHECKS = 0;
-- do the update, eg:
update authorities set username='AdminBob' where username='bob1';
-- return the foreign key check to 1, i.e.:
SET FOREIGN_KEY_CHECKS = 1;
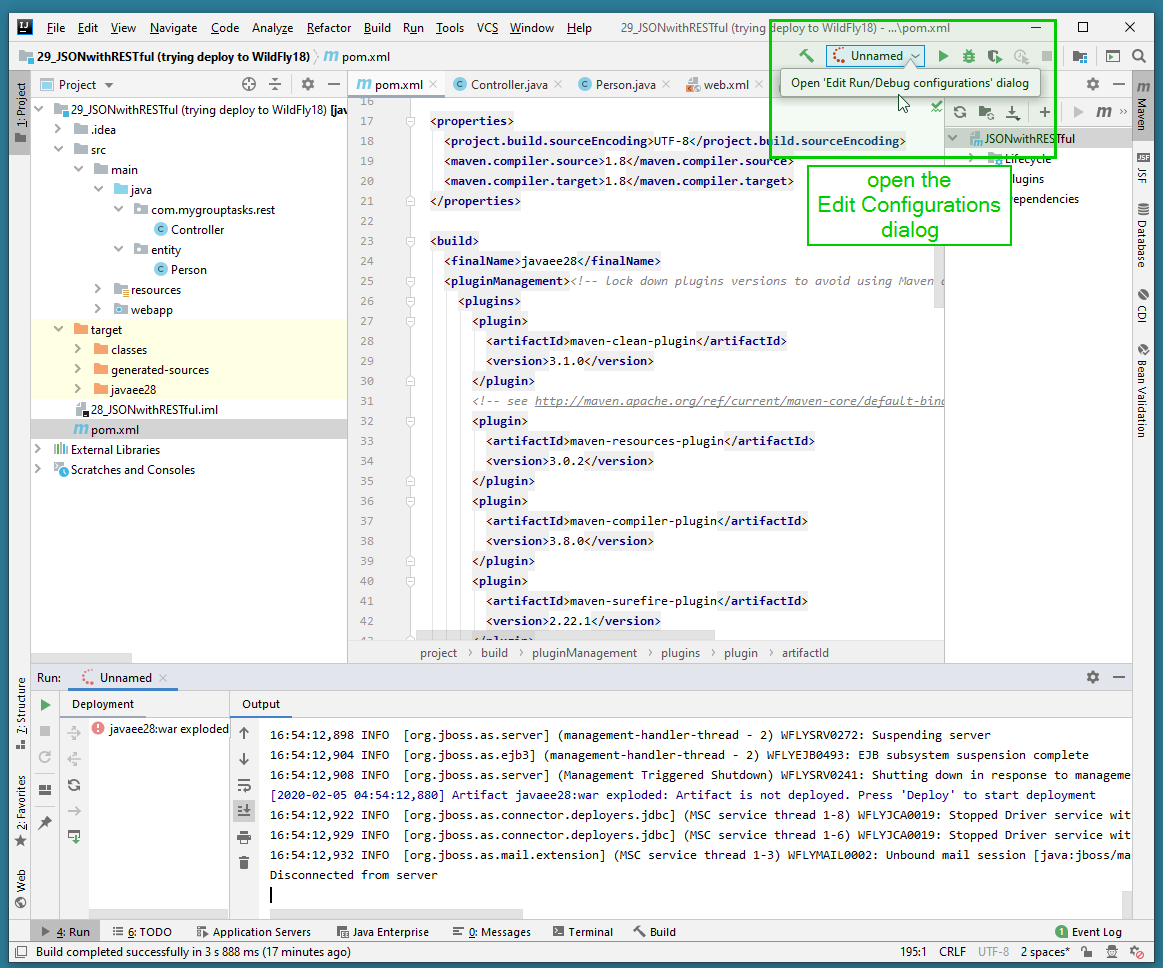
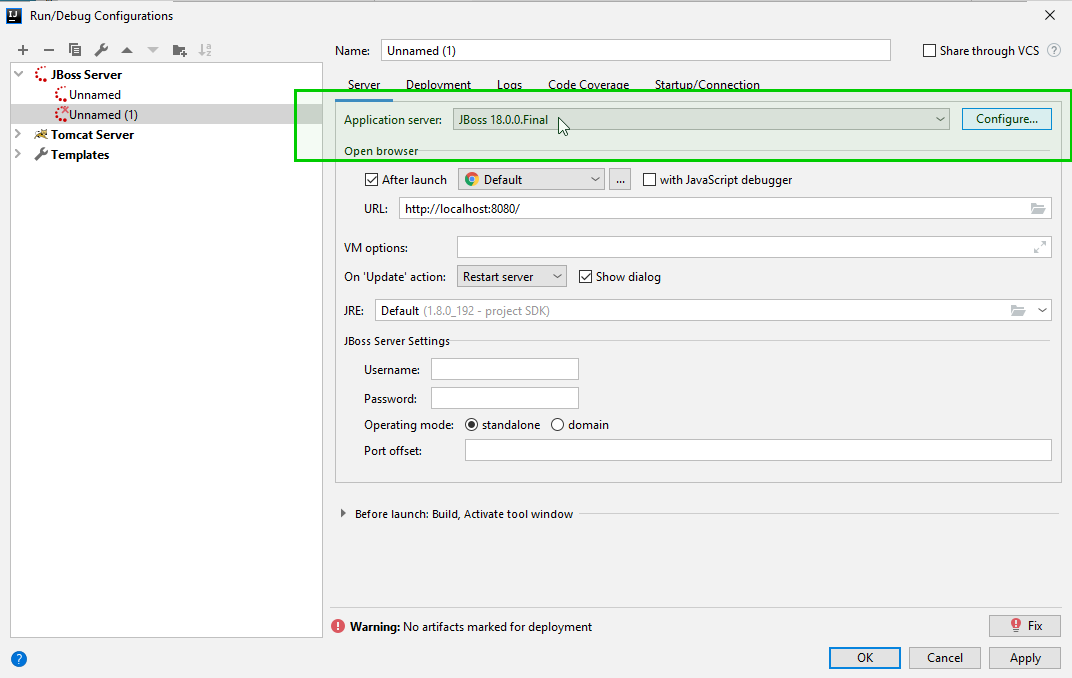
Below are images on how to set up a new local JBoss configuration for your Java EE application in IntelliJ IDEA Ultimate, given that you have downloaded and installed WildFly18 in a folder such as in C:\wildfly-18.0.0.Final.
Open the dialog box to edit a run configuration:
2. Click on Edit Configuration to start setting up a new configuration:
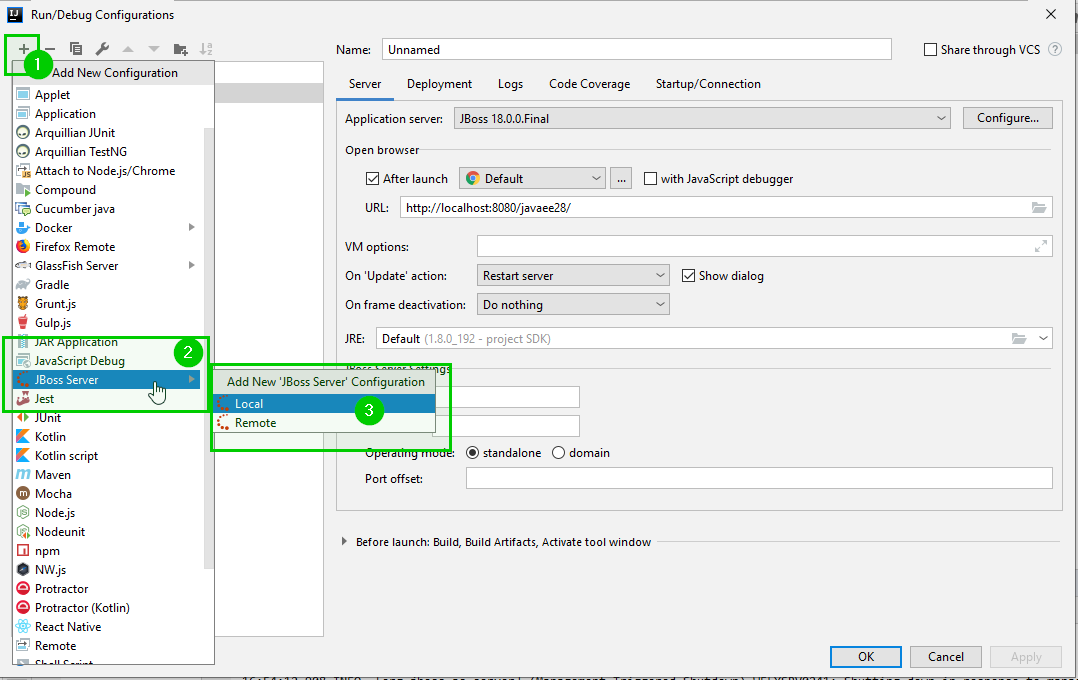
3. Locate the JBoss Server configuration and add a local setup:
4. Select the installed application server folder by clicking on Configure:
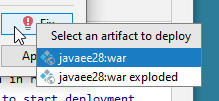
5. Since the “Fix” button shows up in the right bottom corner, click the button and select the option that you wish, in this example, war exploded option
The “Deployment” tab now shows the war file being deployed:
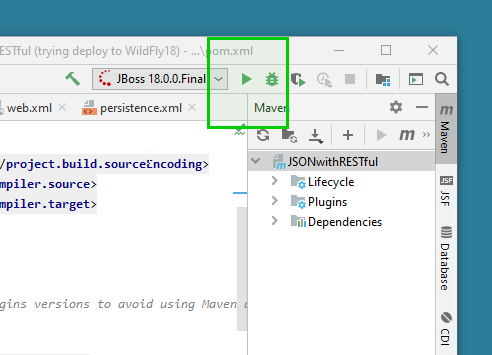
6. You now have a JBoss configuration availabe which you can run your Java EE app on.
 App 1
App 1 Här finns projektet för att ladda ner: