Working with JSON in RESTful applications

There are many JSON libraries that make JSON works possible in a Java application. When responding HTTP response that should be in JSON format we should use the annotation:

@Produces(MediaType.APPLICATION_JSON)

With the Http Methods Get, Post, Delete, Put and Patch, we should consider the respective annotation, i.e. @GET, @POST, @DELETE, @PUT and @PATCH.

Since it is desirable that RESTful Java apps reply through JSON objects, we do responses in JSON format.

One way would be to write a String variable but use the curly brackets and backslashes as in

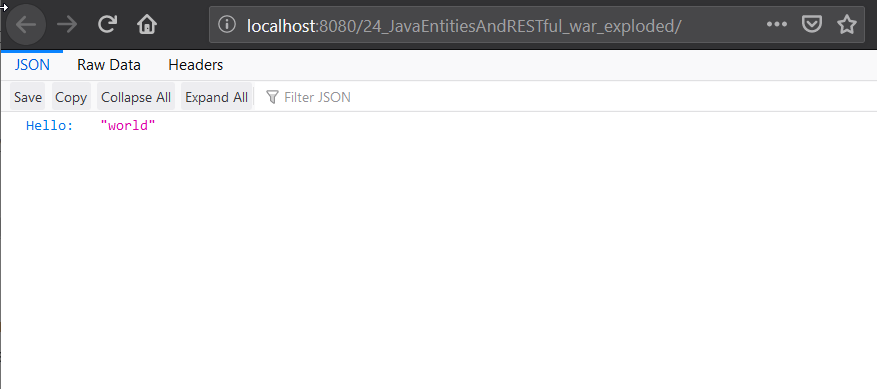
String var1 = "{\"Hello\":\"world\"}";

return Response.ok(var1).build();

Another way would be to use a library package like Gson. More reading can be found at: https://github.com/google/gson

            JSONObject obj = new JSONObject();
            obj.put("name", "foo");
            String json = new Gson().toJson(obj);
            return Response.ok(json).build();
            
            /* Returns:
            {
                "map": {
                "name": "foo"
            }
            }
            */

Its Maven dependency would be:

      <dependency>
          <groupId>com.google.code.gson</groupId>
          <artifactId>gson</artifactId>
          <version>2.8.6</version>
      </dependency>

Another technique is using the org.json’s JSONObject and to use its .toString at return time:

            JSONObject obj = new JSONObject();
            obj.put("name", "foo");
            return Response.ok(obj.toString()).build();

Its dependency is as follows and more reading can be found at ttps://www.tutorialspoint.com/json/json_java_example.htm

    <!-- https://mvnrepository.com/artifact/org.json/json -->
    <dependency>
      <groupId>org.json</groupId>
      <artifactId>json</artifactId>
      <version>20190722</version>
    </dependency>

Java applications using the Jersey implementation for RESTful Java apps can use the Jersey media dependency. More reading on this can be found at: https://code.i-harness.com/en/q/120cba9 where we see that the right Maven dependency can help in returning JSON objects from Java variables:

<dependency>
    <groupId>org.glassfish.jersey.media</groupId>
    <artifactId>jersey-media-json-jackson</artifactId>
    <version>{latest version}</version>
</dependency>

For example to return a List variable in JSON format using the above dependency, we can write code where we use the @POST annotation, prepare a list of persons and return via Response.ok(persons).build.

    @POST
    @Path("/all")
    @Consumes(MediaType.APPLICATION_JSON)
    @Produces({MediaType.APPLICATION_JSON})
    public Response all() {
        Person p1 = new Person (1, "Bob", "bob@test.com", "0123456789", "123 Main St.");
        Person p2 = new Person (2, "Bob2", "bob@example.com", "0987654321", "456 Main St.");
        Person p3 = new Person (3, "Bob3", "bob@company.com", "0700123456", "789 Main Street");
        List<Person> persons = new ArrayList<Person>();
        persons.add(p1);
        persons.add(p2);
        persons.add(p3);
        
        //good resources:
        // https://stackoverflow.com/questions/41761082/convert-list-to-jsonobject-in-java-using-json-simple
        //https://code.i-harness.com/en/q/120cba9 //java - webservices - jersey return arraylist json

        System.out.println("List: " + persons);

        return Response.ok(persons).build(); //this works
        //return Response.ok().entity(persons).build(); //this works also
    }

}

A more complete example as an IntelliJ IDEA project, with a GET and a POST method and their JSON Response can be downloaded here.

Other resources:

Setting up IntelliJ IDEA Ultimate for basics of a Maven RESTful app with dependencies Jersey, Hibernate, Lombok

  1. Start IntelliJ IDEA Ultimate and create a new Maven project.
  2. Use Maven Archetype “webapp”. (maven-archetype-webapp). Follow through the rest of the New Project setup
  3. Write/Add Java app files under src/main folder. A Java folder marked as the Source Folder can contain the files being written.
  4. Update the pom.xml file with details on packaging, Java JDK version, plugins and dependencies with the code as in the example below:
<?xml version="1.0" encoding="UTF-8"?>

<project xmlns="http://maven.apache.org/POM/4.0.0" xmlns:xsi="http://www.w3.org/2001/XMLSchema-instance"
  xsi:schemaLocation="http://maven.apache.org/POM/4.0.0 http://maven.apache.org/xsd/maven-4.0.0.xsd">
  <modelVersion>4.0.0</modelVersion>

  <groupId>com.mygrouptasks</groupId>
  <artifactId>javaee24</artifactId>
  <version>1.0-SNAPSHOT</version>
  <packaging>war</packaging>

  <name>javaee24 Maven Webapp</name>
  <!-- FIXME change it to the project's website -->
  <url>http://www.example.com</url>


  <properties>
    <project.build.sourceEncoding>UTF-8</project.build.sourceEncoding>
    <maven.compiler.source>1.8</maven.compiler.source>
    <maven.compiler.target>1.8</maven.compiler.target>
  </properties>

  <build>
    <finalName>test2</finalName>
    <pluginManagement><!-- lock down plugins versions to avoid using Maven defaults (may be moved to parent pom) -->
      <plugins>
        <plugin>
          <artifactId>maven-clean-plugin</artifactId>
          <version>3.1.0</version>
        </plugin>
        <!-- see http://maven.apache.org/ref/current/maven-core/default-bindings.html#Plugin_bindings_for_war_packaging -->
        <plugin>
          <artifactId>maven-resources-plugin</artifactId>
          <version>3.0.2</version>
        </plugin>
        <plugin>
          <artifactId>maven-compiler-plugin</artifactId>
          <version>3.8.0</version>
        </plugin>
        <plugin>
          <artifactId>maven-surefire-plugin</artifactId>
          <version>2.22.1</version>
        </plugin>
        <plugin>
          <artifactId>maven-war-plugin</artifactId>
          <version>3.2.2</version>
        </plugin>
        <plugin>
          <artifactId>maven-install-plugin</artifactId>
          <version>2.5.2</version>
        </plugin>
        <plugin>
          <artifactId>maven-deploy-plugin</artifactId>
          <version>2.8.2</version>
        </plugin>
      </plugins>
    </pluginManagement>
  </build>


  <dependencies>

    <dependency>
      <groupId>javax</groupId>
      <artifactId>javaee-api</artifactId>
      <version>7.0</version>
    </dependency>
    <dependency>
      <groupId>javax.servlet</groupId>
      <artifactId>servlet-api</artifactId>
      <version>3.0-alpha-1</version>
    </dependency>
    <dependency>
      <groupId>org.glassfish.jersey.containers</groupId>
      <artifactId>jersey-container-servlet</artifactId>
      <version>2.29.1</version>
    </dependency>
    <dependency>
      <groupId>javax.ws.rs</groupId>
      <artifactId>javax.ws.rs-api</artifactId>
      <version>2.1.1</version>
    </dependency>
    <dependency>
      <groupId>org.glassfish.jersey.inject</groupId>
      <artifactId>jersey-hk2</artifactId>
      <version>2.26</version>
    </dependency>
    <dependency>
      <groupId>org.eclipse.persistence</groupId>
      <artifactId>javax.persistence</artifactId>
      <version>2.0.0</version>
    </dependency>
    <dependency>
      <groupId>org.hibernate</groupId>
      <artifactId>hibernate-entitymanager</artifactId>
      <version>4.2.18.Final</version>
    </dependency>
    <dependency>
      <groupId>mysql</groupId>
      <artifactId>mysql-connector-java</artifactId>
      <version>8.0.15</version>
    </dependency>
    <dependency>
      <groupId>org.projectlombok</groupId>
      <artifactId>lombok</artifactId>
      <version>1.18.10</version>
      <scope>provided</scope>
    </dependency>
    <!-- https://mvnrepository.com/artifact/org.json/json -->
    <dependency>
      <groupId>org.json</groupId>
      <artifactId>json</artifactId>
      <version>20190722</version>
    </dependency>

  </dependencies>

</project>
  • To run the project on a local server, “Edit Configuration” under the “Run” menu. Set up a configuration based on a local server that you have, for example a local “Tomcat Server”, version 8.5.50. There will be a red icon on the “Fix” button on the bottom right corner, which can be clicked with an option “war exploded” selected. Clicking “Ok” adds configuration.
  • Find the “webapp” folder under the main root of the project which holds the “WEB-INF” folder. In this folder, update or create the “web.xml” file to specify the servlet name, init-param detail, and servlet-mapping detail, for example like the example below:
<?xml version="1.0" encoding="UTF-8"?>
<web-app xmlns:xsi="http://www.w3.org/2001/XMLSchema-instance"
         xmlns="http://java.sun.com/xml/ns/javaee"
         xsi:schemaLocation="http://java.sun.com/xml/ns/javaee
http://java.sun.com/xml/ns/javaee/web-app_3_0.xsd"
         id="WebApp_ID" version="3.0">
  <servlet>
    <servlet-name>Jersey REST Service</servlet-name>
    <servlet-class>org.glassfish.jersey.servlet.ServletContainer</servlet-class>
    <init-param>
      <param-name>jersey.config.server.provider.packages</param-name>
      <!--            <param-value>com.javatpoint.rest</param-value>-->
      <param-value>com.mygrouptasks.rest</param-value>
    </init-param>
    <load-on-startup>1</load-on-startup>
  </servlet>
  <servlet-mapping>
    <servlet-name>Jersey REST Service</servlet-name>
    <url-pattern>/*</url-pattern>
  </servlet-mapping>
</web-app>
  • Create the “resources” folder under src/main folder, and create or have the “META-INF” folder. Ceate your persistence.xml file there. Here is a persistence.xml file example:
<?xml version="1.0" encoding="UTF-8"?>
<persistence xmlns="http://java.sun.com/xml/ns/persistence"
             xmlns:xsi="http://www.w3.org/2001/XMLSchema-instance"
             xsi:schemaLocation="http://java.sun.com/xml/ns/persistence
             http://java.sun.com/xml/ns/persistence/persistence_2_0.xsd"
             version="2.0">

    <persistence-unit name="TaskPU">
        <provider>org.hibernate.ejb.HibernatePersistence</provider>
        <properties>
            <property name="hibernate.connection.url" value="jdbc:mysql://localhost/worksuggest" />
            <property name="hibernate.connection.driver_class" value="com.mysql.jdbc.Driver" />
            <property name="hibernate.connection.username" value="root" />
            <property name="hibernate.connection.password" value="rootpass" />
            <property name="hibernate.archive.autodetection" value="class" />
            <property name="hibernate.show_sql" value="true" />
            <property name="hibernate.format_sql" value="true" />
            <property name="hbm2ddl.auto" value="update" />
        </properties>
    </persistence-unit>
</persistence>
Localhost server running RESTful App returning a JSON Object

Tutorials on utilizing JPA and the Hibernate implementation with entities that have bidirectional relationship in two tables

Although one or two tutorials can lead to the answer in how to write code for entities that hold bidirectional relationship, here is a suggest set of links and descriptions that can help:


Other resources through out the development (in a more or less orderly list of suggested readings):

Related Questions:

Brief notes on Java EE’s JPA and its implementation, mainly by Hibernate

Database interactions in a Java EE application are done through JPA.

  • JPA is a specification that defines the management of relational data in a Java application.
  • JPA is a specification and needs an implementation
  • JPA has concepts that an implementation must cover.
    • Entity
      through the javax.persistence.Entity class
    • Field Persistence
      All fields in the object are persisted unless annotated with @Transient.
    • Relationships
      JPA specifies how we should manage relationships between different database tables. @OneToOne, @OneToMany, @ManyToOne, @ManyToMany
    • EntityManager
      through the javax.persistence.EntityManager class —
      EntityManager contains common Create, Read, Update and Delete (CRUD) operations that are “persisted” to the database.

JPA has implementations available such as Hibernate and EclipseLink. Otherwise there is a lot of code to write classes for the above. Benchmarks for the implementations are available.
Hibernate is one of the mature implementations (described below). EclipseLink is another implementation, which is open source,
supports a number of other persistence standards such as Java Architecture for XML Binding (JAXB) and has an XML Representation. EclipseLink has extensions of its own such as @ReadOnly, @Struct while not having an annotation such as @BatchSize which is featured in Hibernate.

Hibernate notes (part 1)

This useful information was found at https://www.baeldung.com/jpa-hibernate-difference
  • with @Entity annotation it uses:
    @org.hibernate.annotations.Entity
  • has also annotations that extend the functionality of @Entity:
    @Table — specify name of table
    @BatchSize — specify batch size when retrieving entities
  • has few extra features that JPA does not specify that may prove useful in larger applications:
    1. Customizable CRUD statements with @SQLInsert, @SQLUpdate, @SQLDelete annotations.
    2. Support for soft deleting
    3. Immutable entities with @Immutable annotation

Hibernate notes (part 2)

This useful information, specifically the examples page can be found at https://www.tutorialspoint.com/hibernate/hibernate_examples.html

A series offered at tutorialpoint.com/hibernate provides Hibernate learning material. The series start with a Home and comprises readings on:

  • ORM Overview
  • Hibernate Overview
  • Architecture
  • Environment
  • Configuration
  • Sessions
  • Persistent Class
  • Mapping Files
  • Mapping Types
  • Hibernate Examples
  • O/R Mappings
  • Annotations
  • Query Language
  • Criteria Queries
  • Native SQL
  • Caching
  • Batch Processing
  • Interceptors
  • ORM

Hibernate notes (part 3)

The useful tutorial is found at: http://www.javawebtutor.com/articles/jpa/jpa-example-using-maven.php

Steps for a Maven JPA application with its persistence dependencies are as below.

  1. Create the POJO entities classes
  2. Add the dependencies to the pom.xml file.
    Artifact IDs are:
    1. javax.persistence
    2. hibernate-entitymanager
    3. mysql-connector-java
  3. set up persistence.xml file in META-INF folder
  4. run a test class

Notes about POJO classes while developing with JPA

  • the class should implement java.io.Serializable
  • POJO entity classes that have fields with one-to-many relationships should be annotated by the annotations that show the relationship. Some of these annotations are @OneToMany and @ManyToOne, @JoinColumn, @mappedBy. A bidirectional relationship between two tables would have annotations @OneToMany and @ManyToOne.
  • if the primary key “id” of the entity class does not have the annotation @GeneratedValue(strategy=GenerationType.AUTO) then one can run the EntityManager’s persist with the entity class that assigns id manually. However, if the primary key “id” has the annotation @GeneratedValue(strategy=GenerationType.AUTO) then entity manager’s persist can be used with a persist that does not have the id included.

Other resources through out the development (in order of occurrence):

Have two simple SQL tables — one holding a foreign key, which references field in other table.

Working with databases from a Java EE application requires understanding of the SQL database tables design. The design which includes table naming, table fields naming, field types and other well-thought-out design elements described by database administrators also includes how the relationship between the various tables works.

It is much better to design the tables with the right structure at first place rather than altering later. Otherwise altering a table would require SQL queries that sometimes take more time to figure out.

Three alteration examples for a MySQL Database table would be:

-- make "id" field in "tasks" table primary:
ALTER TABLE tasks ADD CONSTRAINT pk_id PRIMARY KEY (id);

-- add auto increment to field in "tasks" table:
ALTER TABLE tasks AUTO_INCREMENT=0;

-- rename column name "id" to "taskStatus_id":
ALTER TABLE task RENAME COLUMN id TO taskStatus_id;

Relationships between tables can be designed through fields that connect one table to the other. Let’s say for example that we design two tables, one called “tasks” and the other called “taskstatus” with a relationship. table A would have fields “id”, “topic”, “description”, “parent_status” and table “taskstatus” holds fields “id”, “status”, “description”. The field “parent_status” of “tasks” table would reference “status” in the “taskstatus” table since we are planning to have our list of task status such as “to do”, “done”, “doing” in its own table.

Relationships that may help us design a better database and application would include one-to-one, one-to-many, and many-to-many relationship between table fields. For these to work the fields should have certain constraints. For a MySQL one-to-many relationship to work, for example, the field that is being referenced in the parent table should either be PRIMARY or UNIQUE.

The completed tables’ SQL structure for our two tables is as follows:

CREATE TABLE taskstatus (
id INT NOT NULL AUTO_INCREMENT,
status VARCHAR(255) UNIQUE,
description VARCHAR(255),
PRIMARY KEY(id)
) ENGINe=INNODB;


CREATE TABLE task (
id INT NOT NULL AUTO_INCREMENT,
topic VARCHAR(255),
parent_status VARCHAR(255),
description VARCHAR(255),
INDEX tasksstatus_ind (parent_status),
PRIMARY KEY(id),
FOREIGN KEY(parent_status) references taskstatus(status) ON DELETE CASCADE
) ENGINE=INNODB;

Now that the tables are ready we can add data:

-- insert an item to the parent table "taskstatus" that holds UNIQUE status
INSERT INTO taskstatus (id, status, description) VALUES (1, "to do", "");

-- now that a "status" is available in the parent table, we can add a task that uses the status we mentioned in order to insert a task with the "status" foreign key value.
INSERT INTO tasks (id, topic, parent_status, description) VALUES(2,"clean garden","to do", "");

To add a record which has a foreign key we can use the SQL code syntax below:

INSERT INTO tasks(topic, parent_status) 
  SELECT 'put books on the shelf',
  status FROM taskstatus 
  
  WHERE
  
  status='to do' LIMIT 1;

Understanding SQL Table relations help design an application with consideration for foreign keys and the SQL statements required when interacting with the database.

Resources during development

Having the basic of a REST based Java app


A Java developer working with web app back-end development is required to have JavaEE development where the program design follows the RESTful architecture. To develop a RESTful application, follow useful tutorials and descriptions for JavaEE, choice of ServletContainers, framework description for developing RESTful web services such as Jersey, annotations that are used in a Java class for a JavaEE REST app, and the servlet naming and mapping in the project’s web.xml file. Some good tutorials that were beneficial to me were:

And some useful descriptions were:

At the time of preparing the Java RESTful app one should consider that the project’s Maven pom.xml file has the correct dependencies, as well as a right way to reference the application’s servlets in the web.xml file. One of the Maven dependencies that works as a ServletContainer and is the base for implementing a “Jax-RS with Jersey” is the jersey-container-servlet:

       <dependency>
            <groupId>org.glassfish.jersey.containers</groupId>
            <artifactId>jersey-container-servlet</artifactId>
            <version>2.29.1</version>
        </dependency>

The content of the web.xml file, which reference the Servlet being developed would then be:

<?xml version="1.0" encoding="UTF-8"?>
<web-app xmlns:xsi="http://www.w3.org/2001/XMLSchema-instance"
         xmlns="http://java.sun.com/xml/ns/javaee"
         xsi:schemaLocation="http://java.sun.com/xml/ns/javaee
http://java.sun.com/xml/ns/javaee/web-app_3_0.xsd"
         id="WebApp_ID" version="3.0">
    <servlet>
        <servlet-name>Jersey REST Service</servlet-name>
        <servlet-class>org.glassfish.jersey.servlet.ServletContainer</servlet-class>
        <init-param>
            <param-name>jersey.config.server.provider.packages</param-name>
            <param-value>com.javatpoint.rest</param-value>
        </init-param>
        <load-on-startup>1</load-on-startup>
    </servlet>
    <servlet-mapping>
        <servlet-name>Jersey REST Service</servlet-name>
        <url-pattern>/rest/*</url-pattern>
    </servlet-mapping>
</web-app>

The good tutorial at https://www.javatpoint.com/jax-rs-example-jersey has a more complete description.

If an error is encountered when deploying the application to the application server, one can search on StackOverflow and with links such as:


Maven pom.xml file structure for an application

When writing a Java application that utilizes library packges developed by others one can form the Maven building and managing system. A Maven project organizes your Java application’s Jar file requirements into an accessible structure and will help build your application when you have finished developing the application. In order for Maven to have a list of Jar files used in the application, Maven saves these references and information in a file called pom.xml.

A pom.xml file has references for example to how you want to package your application (for example jar or war), the plug-ins that help build the application and the jar libraries.

The jar libraries are included in the “dependecies” part of the pom.xml file and are organized into a code format:

<dependency>
  <groupId> name of group </groupId>
  <artifactId> name of artifact </artifactId>
  <version> version number </version>
</dependency>

  • Here is one pom.xml file for a JavaEE web app that is used to develop a servlet, which has a MySQL database connection within the servlet:
<?xml version="1.0" encoding="UTF-8"?>
<project xmlns="http://maven.apache.org/POM/4.0.0"
         xmlns:xsi="http://www.w3.org/2001/XMLSchema-instance"
         xsi:schemaLocation="http://maven.apache.org/POM/4.0.0 http://maven.apache.org/xsd/maven-4.0.0.xsd">
    <modelVersion>4.0.0</modelVersion>

    <groupId>com.mygrouptasks</groupId>
    <artifactId>assistancesDescription</artifactId>
    <version>1.0-SNAPSHOT</version>
    <packaging>war</packaging>

    <properties>
        <maven.compiler.source>1.8</maven.compiler.source>
        <maven.compiler.target>1.8</maven.compiler.target>
    </properties>

    <build>
    <finalName>assistDescrip</finalName>

    <plugins>
        <plugin>
            <groupId>org.apache.maven.plugins</groupId>
            <artifactId>maven-compiler-plugin</artifactId>
            <version>3.2</version>
            <configuration>
                <source>1.8</source>
                <target>1.8</target>
            </configuration>
        </plugin>

        <plugin>
            <artifactId>maven-clean-plugin</artifactId>
            <version>3.1.0</version>
        </plugin>

        <plugin>
            <groupId>org.apache.maven.plugins</groupId>
            <artifactId>maven-resources-plugin</artifactId>
            <version>3.0.2</version>
        </plugin>

        <plugin>
            <artifactId>maven-compiler-plugin</artifactId>
            <version>3.8.1</version>
        </plugin>

        <plugin>
            <artifactId>maven-surefire-plugin</artifactId>
            <version>2.22.1</version>
        </plugin>

        <plugin>
            <artifactId>maven-war-plugin</artifactId>
            <version>3.2.2</version>
        </plugin>

        <plugin>
            <artifactId>maven-install-plugin</artifactId>
            <version>2.5.2</version>
        </plugin>

        <plugin>
            <artifactId>maven-deploy-plugin</artifactId>
            <version>2.8.2</version>
        </plugin>

    </plugins>
    </build>

    <dependencies>
        <dependency>
            <groupId>javax</groupId>
            <artifactId>javaee-api</artifactId>
            <version>7.0</version>
        </dependency>
        <dependency>
            <groupId>javax.servlet</groupId>
            <artifactId>servlet-api</artifactId>
            <version>3.0-alpha-1</version>
        </dependency>
        <dependency>
            <groupId>mysql</groupId>
            <artifactId>mysql-connector-java</artifactId>
            <version>8.0.17</version>
        </dependency>
    </dependencies>
</project>


Min upplevelse i vårdbiträde/ undersköterska arbetsrollen och mitt gymnasiearbete

Att välja arbetsuppgifter dagligen på ett etiskt sätt är en egenskap som härliga människor utvecklar. En ledare, en lärare och en undersköterska är några av de personer som påverkar dig mest med härlig och snäll attityd.

När du har erfarna undersköterskearbetsledarna som tar emot dig i glädje, som litar på dig på ditt arbete, som ger dig lite mer anpassade arbetsmoment och stöder dig även om att det kan vara lite för mycket i början så känner man att det varit det bästa val att vara med.

Vill man lära sig från människor och att bidra till livskvaliteten så finns det bra alternativ. Att vara undersköterska är en av dem.

På en sådan utbildning så har jag upplevt:

  • Hur en härligt lärare ger elever tröst i vad som de valt.
  • Hur den fina attityden som dina klasskamrater har för arbetsrollen har lönat sig.
  • Hur man målsätter för arbete i framtiden.
  • Hur viktigt etiska diskussioner är.
  • Vad som några av vårdrutiner hjälper med när det gäller kroppen, livskvalitet, teori, definitioner om hälsan, och ämne som rör sig om boendes dagliga liv.

På min praktikplats så såg jag hur mina arbetsledarna arbetar och hur jag till exempel kan:

  • öka kvalitet med boendes matvanor
  • fråga boende och assistera till verksamhetens trädgård
  • spela en musikinstrument om man kan eller lyssna på kollegor som kan.
  • vara tillgänglig för boende.
  • lära sig vårdrutiner med till exempel hygien, blodprov, och blodtrycksmätning

En undersköterska tar hänsyn till sammanhang i verksamheten, boendes stöd, och personlig utveckling.

Jag rekommenderar att man väljer sitt arbete medveten och försöker förstå hur man påverkar människor man kommer i kontakt med. Att göra positiva skillnader i andras liv kan vara den bästa gåvan du ger dig själv. Oavsett hur svårt eller givande arbetet varit så är det fortfarande mans egen val. Så får man reflektera över den givande rollen, hör andras kritik, och gör vad som är etisk och gör skillnad för personer. Det lönar sig enormt och då blir man tacksam. Jag valde att utbilda mig till undersköterska på ett medvetet sätt i början. Jag har haft lärarna, arbetsledarna, kontaktpersoner, bekant och kompisar som valde olika utbildningar och arbetsroll på det medvetna sättet och de har haft stor påverkningar på mig till exempel som också ville välja bra.

Yatzi

A project for the game board “Yatzi”, this app gives the user 5 random dices and the score cards to play. The project is written in JavaScript and the JavaScript framework Vue.js.

To name a few technical details, there is a JavaScript file processing the results for the 5 thrown dices to find all possible scoring rules which the user can select, a set of Vue.js components which make the various parts of the logical and graphical interface, a main Vue.js Store with mutations and getters, and the logic for dice roll. The Vue.js components include card displays, user name and number-of-players feature, and game score display.

Some suggested files and links are: